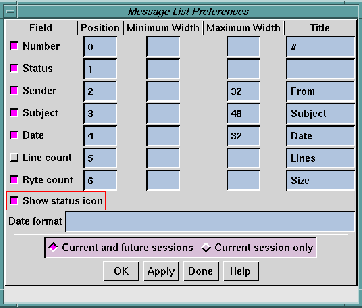
The Message List ... option lets you change the column order and the column width of message status information in the window. You can also elect to show or to hide the message status icon.
Specifically, you control:
To modify or reorder message status information, click the Message List ... option. The Message List Preferences window appears.

The Message List Preferences window contains a row of toggle buttons, each of which controls an associated message status Field (or status column). The fields are:
The default value for all message status fields is On. To remove any field from the Main window message status list, simply toggle the button associated with that field to Off. When you apply this change, the field is removed from the message list.
Adjacent to each toggle button is set of four text fields in which you can enter values to specify the Position, Minimum Width, Maximum Width, and Title of each message status field. These values are applicable to message status fields that are toggled On.
As you specify your preferences for each message status Field, you can apply your changes interactively at any time to see how they look.
The procedure for specifying your message status field preferences is simple. For each message status Field (or status column) that is toggled On:
The lowest number in a Position text field places its associated message Field furthest left in the message list; the highest number places its associated message Field furthest right.
A non-zero value means the field will always display the specified number of characters, even if all of the entries are smaller.
A value of zero or blank means the field will always expand to accommodate the longest line of text. A non-zero value means the field will never display more than the specified number of characters, even if one of the field's entries is longer.
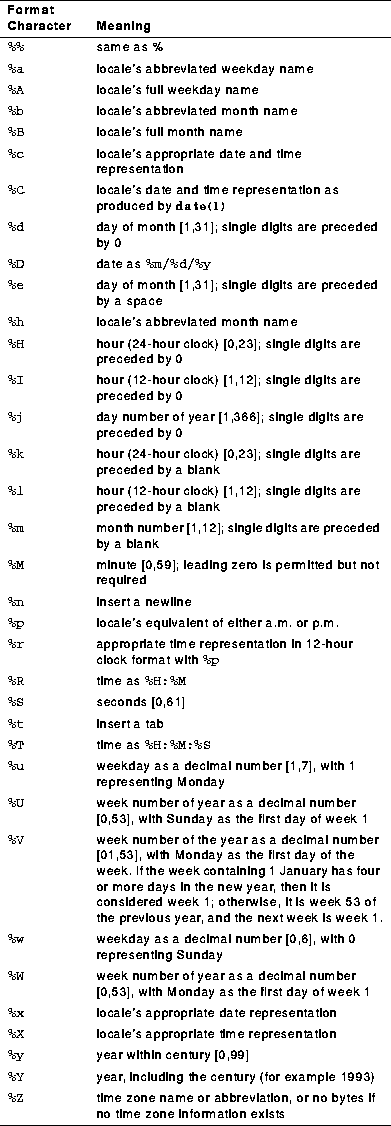
You can modify the format used to display the Date column by specifying the format using the syntax of the strftime(3) library function.
Each conversion specification is replaced by appropriate characters as described in the following list. The appropriate characters are determined by the LC_TIME category of the program's locale, as shown in Date Format.

The following example illustrates the use of the date format string. Assuming the date is Thursday, August 28, 1986 at 12:44:36, and a format string:
%A %b %d %j
This results in date containing Thursday Aug 28 240.
The default for the Date format field is a blank string, meaning that the date will take the format of the original message.
Apply or cancel your changes using the row of buttons across the bottom of the window. See Applying Your Changes.